Showing posts with label Beef. Show all posts

Friday, 11 July 2014

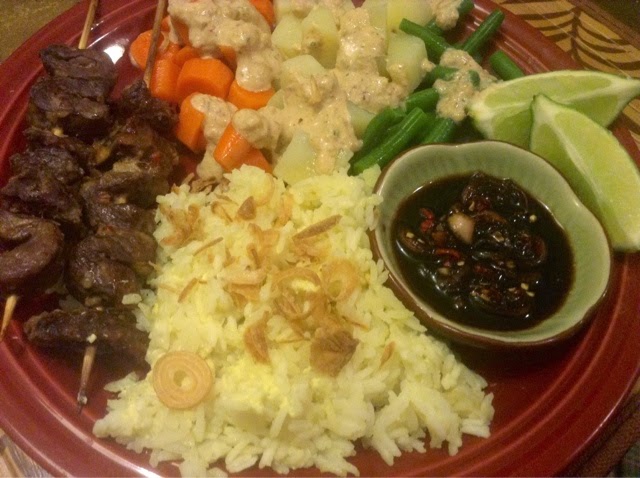
Sate Ampet Sasak with Sambal Kecap and simple Lotek (Indonesian) Lombok-Style Beef Satay with Sweet Soy Sauce Sambal and Steamed Veggies with Peanut Dressing


I love making a whole meal of the same cuisine since the flavours go well together and create THE experience.  I made this Indonesian menu and it was awesome, even though I'm not sure if Indonesians would serve them together...  who cares!?  Not me.  So this plate has beef satay with sambal, boiled vegetables with peanut sauce and fragrant rice (I'll post the recipe for this rice very soon).

The satay are a little different from most satay.  Instead of marinating the meat cubes in a paste, you fry the paste, simmer it with coconut milk, reduce, cool down, and then you mix it with the meat and marinate.  The result was awesome, most satay don't use coconut, some use grated coconut, but coconut milk is one of my favourite tastes/ingredients so I guess this makes these Lombok-style satay one of my favourite satay.  Did I use the word satay enough yet?  Oh, and the sambal/dipping sauce served with the SATAY is simple and simply tastes delicious and addictive.

The lotek is a quick vegetable side dish to whip out, especially if you made the dressing ahead.  If you do make it ahead, you can restore the sauce to its original consistency by adding a little bit of warm water and mixing.  This fragrant dressing makes boiled vegetables taste like the fanciest salad ever!

So I present to you the recipes for Lombok-style marinated satay, sambal kecap and lotek, all 3 from the book Authentic Recipes from Indonesia by Heinz Von Holzen and Lother Asarna.


(serves 4-6)

-2lbs/1kg beef cubes
-lime wedges to serve
-2 recipes sambal kecap to serve (recipe follows)
-skewers (soaked in water for an hour if baking in the oven or grilling on charcoal)

Marinade:
-4 candlenuts/kemiri nuts (replace by cashews or boiled almonds)
-1 inch ginger, peeled and roughly sliced
-2 red lombok chillies (replace by one or two bird's eye chillies without the seeds)
-2-3 bird's eye chillies, without seeds
-5 garlic cloves
-1/2tsp terassi (dried shrimp paste), roasted in a piece of aluminum foil in a hot oven for 5-10 minutes
-1tsp salt

-2tbsp oil
-1cup coconut milk (thick if you can find it)

Grind all the marinade ingredients together in a paste with a food processor or mortar and pestle.  In a non-stick pan over medium heat, heat up the oil then add the paste and stir-fry for 5 minutes or until fragrant.  Add coconut milk, lower the heat to medium-low, and simmer for about ten minutes or until the marinade has thicken.  Let it cool then mix it well with the beef cubes and marinate in the fridge for at least 2 hours.

Skewer the meat and cook in a pan, in an oven or on a bbq, turning often and basting with the leftover marinade.  Serve with 2 recipes of sambal kecap.

------------------------------------------------------------------------------

And the recipe for sambal kecap, a really simple, easy to prepare and tasty sauce/condiment!

-3-4 shallots, thinly sliced
-1 lombok chilli thinly sliced (or 1 or 2 bird's eye chillies, deseeded if desired)*
-2tbsp kecap manis (thick sweet soy sauce)

Mix everything together!

*Indonesian cuisine uses mainly red lombok chillies, which are about finger-length and less spicy than bird's eye chillies, but I have a really hard time finding them, especially the red ones that i might have seen only once in Indiatown last summer, so I usually use a smaller amount of bird's eye chillies.  You can deseed them if you want but we like a good amount of spice.  Also, even when bird's eye chillies are used, it's almost always the red ones, but I like the taste of the green ones, so I take the liberty to mix them, especially in this sambal kecap, it adds a little wow!


And to finish, a recipe for lotek. Lotek is a salad of blanched vegetables with a peanut dressing. From what I understood, Lotek's dressing is similar to gado-gado's, but with less ingredients.  For example, in many recipes that I saw (I mean like websites and books that contain recipes for both lotek and gado-gado), gado-gado's dressing has kaffir lime leaves but lotek's doesn't. Anyhow, except the selection of vegetables and toppings, I'm not very sure about the differences between these two salads.  I like both!

Dressing (grind all ingredients in a food processor or mortar):
-1/2cup roasted peanuts
-2cm kencur root, peeled (lesser galangal, probably can be substituted for galangal since it's such a small amount)
-2-3 bird's eye chillies, without seeds
-1/2tsp roasted terassi
-1tsp palm sugar
-1tsp salt
-2tbsp water (or more if it is too thick)

You can serve the dressing on a mix of these suggested vegetables:
-blanched water spinach, spinach, or any kind of greens
-blanched or steamed pumpkin, kabocha, sweet potato, or any kind of squash
-green beans or snake beans
-potatoes
-carrots
-bean sprouts

I guess you can inspire yourself from this recipe and do anything you want.  I also added kaffir lime leaves in my dressing because I love them.  You can make it simple like on these pictures, or make it really diverse and fancy!  You'll be surprised how good boiled potatoes and peanut sauce go well together!


Saturday, 14 June 2014

Pizzaghetti with Cheese and Sambal Oelek Stuffed Crust (Italian-ish, Junk Food) Pizza with Spaghetti and Meat Sauce ON IT


Today's post is for my mom, so exceptionally this post will be in French and English.


Depuis de nombreuses années, ma mère commande cette pizza spéciale qu'on ne trouve qu'à Longueuil, ville sur la Rive-Sud de Montreal.  Cette pizza nommée "pizzaghetti", contrairement aux autres pizzaghettis, n'est pas simplement une pizza coupée en deux avec du spaghetti au milieu.  Quand vous appelez chez Miss Italia, on s'assure que vous savez que le spaghetti est SUR la pizza, sous le fromage.

La dernière fois que nous avons mangé de la pizzaghetti, ils n'ont pas été très généreux avec le bacon, alors quand j'ai fait ma propre pizzaghetti, je me suis assurée qu'il y en avait assez.  Pour moi, j'ai ajouté une croûte farcie au fromage et au sambal oelek!

Cette recette est pour une pizza de 12pouces/30cm, et c'est assez pour 3 ou 4 personnes, très bourrant avec le spaghetti!  C'est facile, mais il y a plusieurs étapes, alors commençons!

-----------------------------------------------------------------------------------------------------------------------

My mom orders this pizza from my home city of Longueuil, on the south shore of Montreal.  It's called pizzaghetti, but it's not a small pizza cut in two with spaghetti in the middle.  When you call for a pizzaghetti at Miss Italia, they make sure you know that the spaghetti is ON the pizza, under the cheese.

Last time we went to visit my parents in Longueuil and they ordered a pizzaghetti, there was barely any bacon on it!  So when I made my own pizzaghetti, I made sure there was enough bacon!  And just for fun, I added a cheese and sambal oelek stuffed crust!

This recipe will make a 12inches/30cm pizza, enough for 3-4 person, remember there's also spaghetti on the pizza!  It's simple to make pizza from scratch, but there's many steps involved, so let's start!


J'ai pris les quantités pour la pâte d'une recette par SortedFood.com, une bande d'anglais trop drôles.  Par contre, j'ai changé complètement l'ordre des ingrédients car j'utilise toujours la levure de la même façon, je me sens plus sécure!

Pâte à pizza:
-1/2c. à thé de levure
-170mL d'eau chaude, à 100F (l'eau très chaude du robinet fonctionne pour moi)
-300g de farine pour pain de préférence, mais tout-usage fera l'affaire
-1c. à thé de sel
-optionnel : 1c. à thé de poudre d'ail

Dissolvez la levure dans l'eau chaude et réservez.

Dans un bol pour mélanger, avec un fouet, combinez bien la farine, le sel, et la poudre d'ail si utilisée. Peu à peu, incorporez le mélange de levure et d'eau à la farine, en mélangeant avec l'autre main, jusqu'à l'obtention d'une boule (pas belle). Transférez la pâte sur un comptoir légèrement fariné et travaillez-la pendant 2 minutes.  Arrosez la pâte avec la moitié de l'huile, et continuez de travaillez la pâte pendant 2 minutes de plus, jusqu'à ce que l'huile soit bien incorporée.  

Dans le bol à mélanger nettoyé, versez le reste de l'huile, puis roulez la boule de pâte dans l'huile pour qu'elle soit totalement couverte.  Recouvrez le tout avec du film plastique et laissez gonfler dans un endroit chaud pour une heure (j'allume mon four au minimum pendant que je fais la pâte, et quand elle est prête, j'éteinds le four et y met le bol avec ma pâte).

Après une heure, la pâte devrait être deux fois sa taille initiale.  Transférez la pâte sur un comptoir et la pétrir pendant 30 secondes pour enlever le gaz.  Ensuite, vous pouvez utiliser la pâte immédiatement, la mettre au frigo jusqu'au souper, ou la storer au congélateur pour plusieurs mois.

Pour faire la pizza, il faut une plaque de 12pouces (30cm) de diamètre.  Fairiner légèrement la plaque avec de la farine de maïs (polenta, pas fécule de maïs) ou de la farine régulière.  Sur le comptoir, roulez la pâte avec un rouleau à pâte jusqu'à ce que votre cercle de pâte mesure environ 14pouces (15-16pouces si vous faites une croûte farcie) pour qu'il y ait du jeu pour la croûte.  Transférez la pizza sur la plaque.  Si vous faites une croûte farcie, faites un cercle de fromage tout autour (et ajoutez de la sauce chili, du sambal oelek, de la bruschetta si vous voulez) environ où la plaque se termine.  Fromage ou non, repliez la croûte tout autour, utilisez un doigt humide si ça ne colle pas bien.  Voilà!  Optionellement, vous pouvez légèrement mouiller la croûte et la parsemer de sésame, de graines graines de pavot, de ce qui vous plaît!  Les garnitures suivent.

-----------------------------------------------------------------------------------------------------------------------

I took the quantities for the dough from SortedFood.com, but I changed the order you add the ingredients in to fit the way I always use yeast, so I feel safer!  Please visit the SortedFood channel on YouTube, these guys are super funny!

Pizza dough:
-1/2tsp yeast
-170mL warm water (100F), my hot tap water is good...
-300g bread flour preferably, but this time I only had all-purpose and it was good
-1tsp salt
-optional: 1/2tsp garlic powder (took the idea from another Sorted pizza)
-1tbsp olive oil

Mix the water and yeast and set aside.  In a medium mixing bowl and using a whisk, thoroughly mix the flour, salt, and garlic powder if using.  Add a little bit of the yeast water at a time and mix with your other hand until the dough has gathered into a rough ball.  Knead three minutes on a floured surface, then fold in half the olive oil and knead for another 2 minutes.  Shape into a ball, put into the cleaned mixing bowl, add the oil and roll the ball in it until it's all covered in oil (prevents from drying).  Cover everything with plastic wrap and leave to rise in a warm place for about an hour (I turn on my oven to minimum while I'm making the dough, then turn it off and leave the dough to rest there).

After an hour, it should have doubled in size.  Knead the dough a little to remove the gaz.  You can now use your dough or wrap it and keep it in the fridge until supper time or store it in the freezer.

To make the pizza, you'll need a 12inches (30cm) baking sheet, floured with corn flour (polenta, not cornstarch) or regular wheat flour. Roll out your dough on a floured surface.  You want it to measure about 14inches wide, so it has an extra inch all around for the crust.  If you're doing a stuffed crust, you can even roll it to 15-16inches wide.  Lay the dough on the baking sheet, centered. Fold the dough all around the pizza to make a crust.  If making a stuffed crust, make a ring of cheese around the pizza leaving an inch or so free.  Add some chili or hot sauce or bruschetta if you'd like, then fold the dough around the cheese to make the crust.  You can run you wet fingers on the dough before folding to make it stick better.  To finish the crust, if you desire, you can wet the crust lightly and sprinkle it with sesame or poppy seeds, or any seeds you like.  Toppings follow.


Voici comment je fais une toute petite quantité de sauce à la viande, rapidement, juste assez pour cette pizzaghetti.  Vous serez surpris combien cette sauce simple est délicieuse.  Quand vous n'avez pas 4 heures pour faire une sauce spaghetti, celle-ci est très bien.  Par contre, si vous avez déjà de la sauce à la viande maison au frigo ou au congélateur, n'hésitez pas à utiliser celle-ci!  Je ne conseille pas les sauces en jarres ou en cannes, aucune ne me plaît vraiment...

Spaghetti:
-1/2 ou 1 portion complète de spaghetti pour une personne (sur la photo j'ai utilisé des nouilles aux oeufs car je croyais que j'avais du spaghetti mais finalement non, mais je conseille fortement les spaghetti en boîte pour la texture)
-un bonne poignée de boeuf ou de porc haché
-2 gousses d'ail
-une poignée de basilic frais, haché
-sel et poivre

Pour la sauce, hachez les tomates et l'ail (j'utilise un robot cullinaire pour aller vite).

Faites cuire complètement la viande hachée dans une poêle anti-adhésive.  Ensuite, ajoutez les tomates et l'ail et faites mijoter vigoureusement et mélangez de temps à autre jusqu'à ce qu'il n'y ait plus trop de liquide.  Ajoutez le basilic, et salez et poivrez (ce devrait être légèrement trop salé pour que le goût de la sauce se démarque de tous les autres ingrédients sur la pizza).

Faites cuire le spaghetti, égouttez-le bien et mélangez-le avec la sauce dans un bol.

Étendez le spaghetti sur la pizza en premier, avant les autres garnitures.

-----------------------------------------------------------------------------------------------------------------------

Here's how I prepare a small quantity of meat sauce really fast just for one pizza.  It is really good though, you could use this recipe for a simple quick meal with pastas, when you don't have 4 hours to simmer a proper sauce. If you've got some of your own spaghetti/meat sauce in the fridge or freezer, don't hesitate to use it instead, but I wouldn't recommend jarred or canned meat sauces, I don't like any of them.

Spaghetti:
-1/2 to 1 portion of boxed dried spaghetti or spaghettini (I used egg flat noodles because I thought I had spaghetti but I didn't, but the spaghetti's texture is way better for this pizza)
-1 handful of ground beef or pork
-2 cloves garlic
-a handful of basil leaves, chopped
-salt and pepper

For the sauce, start by chopping the tomatoes and garlic cloves really fine (I used a food processor). Stir-fry the ground meat in a non-stick pan.  Once it's cooked, add the tomatoes and garlic and simmer on high while mixing every once in a while until there's not too much liquid left.  Toss in the basil, then salt and pepper to taste, or a little saltier than to your taste should be perfect.

Cook spaghetti and drain them properly.  Toss them in a bowl with the sauce, then distribute evenly on the pizza dough before your other toppings.


Pour la garniture, la pizzaghetti Miss Italia utilise:
-quelques champignons blancs, tranchés
-du bacon, j'ai utilisé 4 tranches coupées en deux (faites cuire le bacon dans un poêle adhésive deux minutes de chaque côté pour le faire suer un peu, ensuite égouttez-le bien sur du pauper absorbant, de cette façon le bacon sera parfaitement cuit et il n'y aura pas trop d'huile sur le fromage)
-je crois qu'il y a du poivron vert?  je n'aime pas alors j'ai mis des tranches de chili
-beaucoup de mozzarella râpé, et plus encore si vous faites une croûte farcie!

Vous pouvez tout de même garnir votre pizza comme vous voulez.  Souvenez-vous seulement que certains ingrédients, comme le bacon, doivent être précuit ou blanchit, de façon à ce qu'ils cuisent complètement en 10 à 15 minutes au four.

Dispersez vos ingrédients (gardez-en quelques morceaux pour décorer sur le fromage) sur le spaghetti.  Recouvrez de fromage et décorez votre pizza avec ce qu'il reste.  Le bacon doit être placé SUR le fromage pour qu'il grille.

Faites cuire votre pizzaghetti à 400F/200C pendant 12 minutes, et ensuite sous le grill (broil) pour 2-4 minutes, jusqu'à ce que le fromage et le bacon soient jolis et bien grillés. Laissez reposer 5 minutes sur le comptoir, et voilà!

J'espère que Maman et tout le monde aimera!

-----------------------------------------------------------------------------------------------------------------------

The Miss Italia pizzaghetti has:
-a couple white mushrooms, sliced
-bacon, I used 4 slices cut in two (make the bacon sweat just a minute or two on each side in a non-stick pan, then drain on paper towels, this way the bacon will be perfectly cooked and there won't be a lot of oil on top of the cheese)
-I think green bellpeppers, I can't remember, I don't like them so I put green long hot peppers, sliced
-a lot of grated mozzarella, and even more if you make a stuffed crust!

You can still put anything you'd like.  Just remember some ingredients might need to be blanched or precooked like bacon so they cook properly within 15 minutes in the oven.

Just lay your toppings on top of the spaghetti (you can keep some to decorate).  Cover with cheese, then add remaining ingredients.  Bacon should be placed on top so it crisps up.

Put the pizza in the oven at 400F/200C for 12 minutes, then broil for 2-4 minutes (keep an eye on it so it doesn't burn).  Let the cheese set on the counter for 5 minutes, then enjoy!


Sunday, 8 June 2014

Rendang (Indonesian)


On June 5th I turned 25!  I had good times even though my boyfriend and I were broke...  The previous weekend, we went to my mom and had T-bones on the barbecue, got some money and a food processor from mom and dad!  On the 5th, I met my boyfriend downtown after his job and we went light shopping (we had $30-40!), had cheap delicious Banh Mi in Chinatown, found a plant of Vietnamese mint!, then I chose this Indonesian cooking book (I'll elaborate later)!  Then on the weekend, we had a couple friends over, our apartment is small, our balcony is kind of spacious and the weather was really nice!  We ended up chilling on the balcony most of the day.  A friend brought drinks, chips and candies, another friend bought everything to assemble a sponge, whip cream and fruits cake, and I made maki sushi, oyaki with soboro pork and some crazy indonesian eggs that I'll have to make again just to share the recipe with the world.  I really should have taken pictures of the feast.  It made me really happy because everyone kept on saying with their mouth full how good it was, or eating and just nodding with the "this is good!" eyes!  It makes me so happy to cook for others!

So back to this Indonesian book!  We went to the bookstore and I had $20 and some change left from our bithday date budget to buy a book.  I cooked enough Vietnamese food lately and I wanted to try some new flavours!  When I check a book about a type of cooking I never tried before, I mostly look at the ingredients.  Indonesian food, of which I know almost nothing of, is full of garlic, chillies, sambal oelek, kecap manis (sweet soy sauce with the texture of oyster sauce), coconut milk, lemongrass, galangal, palm sugar...  Everything I like!  And no cilantro anywhere (poor cilantro, I hate him)!

The said book is called Indonesian Cooking by Dina Yuen.  It's a book of mostly easy but really tasty dishes and also a couple different sambals (really intense condiments served with satays, lalapan, everything really).  I didn't know until I checked on the internet, but a proper Indonesian meal is served with a lalapan, which is an assortment of fresh and blanched vegetables accompanied by any kind of sambal from what I understood.  The vegetables can be tomatoes, cucumbers, lettuces and herbs, blanched green beans, any type of vegetable that ends with choy (blanched), any type of cabbage (blanched), any greens...  That's what I've seen around the internet, but I guess you can put whatever you want or have in the fridge.  Tonight I'm making a noodle stir-fry that doesn't have that many veggies, so I'll try making lalapan to balance things out (and for fun!).

You'll hear a lot about this book, Indonesian Cooking by Dina Yuen, from where today's recipe comes from.  I present to you Rendang, some kind of very fragrant beef curry, from the book, simplified by me and including some of my tips!


(serves 4)

Grind everything into a paste (with mortar or food processor):
-14 garlic cloves, peeled
-2inches of peeled ginger, sliced
-1inch galangal, peeled and sliced
-white parts of 2 lemongrass stalks, roughly chopped

-1 1/2lb beef, cubed (for short time stewing)
-2tsp sambal oelek
-3/4tsp salt
-2cups coconut milk
-1tsp or more black pepper
-1/2tsp sugar
-1/4tsp turmeric powder
-10 kaffir lime leaves

In a medium sized NON-STICK (learn from my experience) pot or high pan, warm up 2tbsp of oil.  Add the paste, sambal oelek and salt and stir 2 minutes until fragrant.  Mix in the beef cubes for a minute, then add the coconut milk, black pepper, sugar, turmeric powder and lime leaves and bring to a boil.  Reduce the heat to medium/medium-high, and simmer for 45 to 90 minutes (depending on the cut of beef) until the beef is soft enough. If it needs more liquid, add a little hot water.  To test this I poke one big chunk of beef with a fork, and if it's too hard to pull the fork out easily, it's not ready yet.  Serve with rice and a salad or veggies or lalapan!


Tuesday, 3 June 2014

Basics to Ramen, compose your own Ramen! (Japanese) Also Soboro Meat, Teriyaki Sauce and more!


You probably know me for trying other people's recipes, but I can cook too!  It's hard for a white girl from Haitian descendant to cook Vietnamese food the first times without a recipe.  You can't reproduce what you've never eaten.  After one year of eating packaged noodles and cheap restaurant every day in our first common apartment, I knew I had to start cooking more.  We used to live in a tiny studio apartment Downtown, with crackheads in the entrance at all hours of the day/night.  I could mostly only cook easy québécois food and French salads and sandwiches (it was my job at a French Café-Bakery-Chocolatier). So we decided to move in a 3 1/2 cheaper and bigger apartment since it was away from Downtown.  I'm really good at reusing furnitures and making up with what we have, my kitchen is like a giant colourful lab, all equipped for Japanese, Indian, Chinese, Korean, Vietnamese and Thai cooking.

So back to the "I'm gonna start cooking" decision.  I'm not sure exactly how it started.  I think I wanted to make onigiri then I started watching Cooking with Dog on YouTube.  After that, I was obsessed that when I have a little spare money, I would buy a Japanese cookbook.  And I did, it was a book from the French-Japanese Laure Kié called "La cuisine japonaise : les bases".  Later on I also bought the other books of that serie, one about noodles and the other about izakaya.  I got Momofuku's book.  I started hanging out at the Korean-Japanese grocery stores and I even found a Japanese (expensive) grocery store where I could find specialized Japanese ingredients and fermentation products (Koji, Nuka bran). I cooked only Japanese and nothing else for about two years!

One of our first dates, my boyfriend brought me to Sumo Ramen, a small really hip Japanese place in Montreal's 4x4 blocks tiny Chinatown.  It was my first time having non-packaged ramen, which should be considered a totally different food.  After cooking Japanese for some time, I remembered this delicious miso-ramen I had and decided to make my own.  Of course, that first ramen I had at Sumo Ramen stayed on my mind, and the garnishes are a reflection of it.  After exploring different recipes and topping, I don't need a recipe anymore.  So here I give you a guide for homemade ramen, with different broths, seasoning, noodles, eggs, garnishes and main toppings (protein) so your can choose and compose your own ramen!


HOW TO COOK A RAMEN:------------------------------------------------------------------------
Here's how you assemble a ramen.  I'll give instructions for the preparations of the different elements in details following this.

(serves 2)

-4 cups of broth
-ginger and/or garlic
-veggies (I usually use carrot strips, shredded cabbage and bean sprouts)
-shoyu or usu-Kuchi shoyu or soy sauce
-mirin
-toasted sesame oil
-optional: miso, if you're making miso-ramen

-2 portions of noodles
-protein topping(see later)
-garnishes (see garnishes later)
-2 eggs (precision later in this article)

Boil the noodles until cooked, then rinse under cold water.

In a non-stick high pan, wok or big pot, add a little oil on medium high.  Cook your ginger and/or garlic a minute, then add your veggies. Cook and toss until wilted.  Add the broth and bring to a boil.  Season (to your taste or the quantities are there later in the seasonings section) with soy sauce and mirin.  Reduce the heat to low and dissolve the miso through a small strainer if using.  Then just remove from the stove and add sesame oil, mix.

To assemble, put the noodles at the bottom of two big soup bowls.  Add the soup, top with your protein, garnishes and egg.

THE BROTH:-----------------------------------------------------------------------------------------
Ramen restaurants have that reputation of putting a lot of love and time and passion into their ramen broth.  The best ramen broth I tried was David Chang's in his Momofuku book.  The problem with that broth is that you HAVE to make a lot, otherwise it's not worth it.  Also, it's really expensive since on top of the usual veggies, kombu seaweed and dried mushrooms, he uses a ton of pork bones, and bacon, AND A WHOLE CHICKEN.  It's starting to be expensive...  When I think ramen, I think of a cheap filling meal.  Also it's summer so we're not gonna eat soup everyday, and we're just two so I like to make small amounts of broth.  You have three options now: bones (pork bones being the most authentic traditional one), or I guess you could use dashi, or if you have unseasoned broth in your fridge or freezer, it would probably work.  So you can make your own broth, but if you don't know how, here's how I do my broths.

PORK BROTH:
-Pork bones
-a piece of kombu seaweed
-a couple dried shiitake mushrooms
-vegetables for flavour, I suggest using some of these commonly used in Japanese cooking ingredients: leek, green onions, onions, carrots, ginger (if the broth isn't for ramen, I'd add lemongrass)
-plenty of water

In a big pot, cover the bones with water, bring to a vigorous boil, then drain and rinse the bones well.  This reduces the amount of scum to skim afterwards a lot, plus if your bones were frozen, no problem!

Put the washed bones back into the cleaned pot and cover with water, maybe an inch or two over the bones.  Bring to a boil, then remove from the stove, add the kombu and dried mushrooms and let it steep for 30 minutes.  Remove only the kombu and bring the broth back to a boil, then reduce heat and let is simmer from 2-6 hours, the more the better.  The 45 last minutes, add all your veggies.  Strain and discard everything, then strain again through a fine mesh strainer for a perfect broth!

DASHI:
Dashi is a really quick broth/condiment that is in almost every Japanese food.  Using it for ramen would make it really unauthentic, but still lend a Japanese taste. The soup would also be lighter.  But it is perfect for vegetarians and this is home style ramen so who cares?  Experiment!

-4 cups water
-a piece of kombu
-one handful of katsuobushi (if you eat fish, they're flakes of whole dried smoke fermented bonito fish) AND/OR a couple dried shiitake if you're vegetarian

Combine all ingredients in a medium pot.  Cover and let steep at room temperature for a minimum of 2 hours to maybe 6 hours.

Put the pot on the stove and warm up slowly.  Before it boils, remove from the stove and strain through a fine mesh strainer.  Discard everything. The before boiling temperature is perfect for the kombu and katsuobushi to release their flavour, and the broth should stay clear too if you don't boil it!

ANY BROTH:
Any broth, like leftover pork or chicken broth, preferably unseasoned so we can season it with Japanese ingredients for that Japanese taste, but you can also experiement!

THE BROTH'S SEASONINGS:---------------------------------------------------------------------
For two people, I use 4 cups of broth.  Here is how I season it!  Each ingredient has its best moment to be added, so please follow the "how to cook a ramen" section at the beginning of this post!

-1tbsp mirin
-1tbsp miso
-1/2tbsp soy sauce
-a splash of sesame oil or to taste

This will make a slightly misoed soup.  If you add more miso, you'll probably need less or none of the soy sauce.  Adjust to taste.  Mirin is a little sweet, miso and shoyu are salty.  Sesame oil is nutty.  Your best friend is your tastebuds!


NOODLES:-------------------------------------------------------------------------------------------
Ramen are generally served with fresh ramen noodles (find them at the Asian market) or sometimes udon.  I also tried homemade pasta (my post on homemade pasta/egg noodles here: http://sunnysdelights.blogspot.ca/2014/04/homemade-egg-noodlespastas-basics.html), thin dried Chinese egg noodles, Korean udon and black rice noodle.  It might not be a traditional ramen but please make this your own and try different noodles!

GARNISHES:------------------------------------------------------------------------------------------
Inspired by Sumo Ramen, here are the garnishes I can't skip on my ramen!  They're all replaceable or optional.
-sesame seeds
-fresh or canned corn kernels
-nori seaweed, a piece or in thin strips
-enoki mushrooms, sometimes I put shimeji too
-sliced green onions
-an egg, precisions following

You could also use any kind of blanched greens, I've seen that before.  If you're doing a modern-experiemental dish, throw some eggplants (gross!) or something, the ramen is your canvas!


THE EGG:--------------------------------------------------------------------------------------------
The egg is a REALLY important element of the ramen.  The usual is a hard-boiled egg cut into 2.  You could also top the ramen with a sunny side-up fried egg, why not?  You could use a poached egg (I'm not really good at making them), or like me, an Onsen Tamago or hot spring slow poached egg.  I tried so many different instructions for Onsen Tamago and even though on the pictures and in the videos it works, it never worked for me, until I found David Chang's tips and I make the perfect Onsen Tamago every time! You can also top asparagus and donburi with these eggs.  They're like a poached egg, with the yolk all runny.  

Onsen Tamago:
-as many eggs as you want.  They'll keep in their shell in the fridge for a day of two.
-a big pot
-little sauce plates, one for each egg to rest on, they must not touch the bottom of the pot
-a thermometer

In the big pot while carefully monitoring the temperate, bring plenty of water to 140F.  Drop the sauce plates at the bottom and with tongs place an egg on each plate.  Put a timer for 40 minutes and check on your thermometer often to make sure the temperature stays as close to 140F the whole cooking time.  After 40 minutes, transfer the eggs to a bowl of water and ice or under running cold water.  Keep in the fridge.  When ready to use, place the eggs in a bowl of warm water for one minute, then crack open on top of your ramen or other dish.


DIFFERENT MAIN TOPPINGS:---------------------------------------------------------------------
You can use anything you want, here are some of my favorite!:
-Kanikuni (fake crab sticks) pulled appart
-Slices of Chinese BBQ pork
-gyoza or dumplings
-shrimps
-a teriyaki chicken leg, sliced in a couple pieces.  (Teriyaki marinade: 2/3cup mirin, 1/3cup shoyu, 2tbsp saké, 2tbsp sugar, some ginger juice, without the pulp)

For volcano ramen like on the picture under, I used this recipe from JustBento/Just hungry for Soboro meat and modified it to make spicy meat, it tastes soooo Japanese! Even though exceptionally I'm almost copying her recipe here, please go see the recipe on her website for a bunch of suggestions on how to use Soboro meat, here: http://justbento.com/handbook/johbisai/basic-meat-soboro

Volcano meat:
-1lb ground beef
-1 to 2tbsp sesame oil
-2 stalks finely chopped green onions
-1 chopped garlic clove
-2tbsp chopped ginger
-2tbsp sugar
-2tbsp saké
-3tbsp oyster sauce
-1tbsp soy sauce
-3tbsp gochujang (korean fermented chili paste)

To a pan, add sesame oil and stir-fry all the veggies until softened.  Add the meat until well cooked.
Add the sugar until melted.
Add saké and stir for a minute to evaporate.
Add everything else and let it cook until most of the sauce is absorbed, mixing frequently.

CONCLUSION:---------------------------------------------------------------------------------------
Home style ramen can be made any way.  If you read all this article, I hope your learnt something and might try it someday.  Please send me images if you do, either here on the blog or on my Facebook page, Sunny García.  Have fun!


Tuesday, 20 May 2014

Bo Cuon Nem (Vietnamese) Beef Rice Noodle Sheets Rolls


When I learned how to make steamed rice noodle sheets, I had to make this recipe I was keeping for the day I'd find the sheets at the grocery store, which never happened.  But no problem now, it's most likely even better with homemade noodles! You can find a (REALLY) detailed recipe for the noodle sheets with instructions on another post I wrote, here: http://sunnysdelights.blogspot.ca/2014/05/my-quang-tom-thit-and-homemade-ho-fun.html.  The best part: you only need rice flour, tapioca starch and water!  And it's fun and pretty fast, and the noodles don't require to be boiled afterwards! For the rolls I was inspired by a recipe I found in Vietnamese Street Food by Tracey Lister and Andreas Pohl, but I changed enough about it to say it's my own I think.  Hope you'll give it a try, a nice, easy, cold dish for this horribly hot summer (add incredibly humid if you're in Montreal, and its North and South shores like us).


(serves 3 - on the picture, I used this recipe for 2 and it was a little too much, and the rolls don't keep good in the fridge at all)

-200g pretty without fat piece of beef, thinly sliced into strips
-2 garlic cloves

-1 recipe rice noodle sheets (http://sunnysdelights.blogspot.ca/2014/05/my-quang-tom-thit-and-homemade-ho-fun.html) or 6 store-bought rice noodle sheets
-lettuce ripped in large pieces
-herbs (the recipe suggests mint and cilantro, I used perilla, basil, mint and parsley, I don't know if the classic Bo Cuon Nem always have mint and cilantro only...)
-1 carrot cut into thin juliennes
-1 cucumber without seeds, cut into thin, long matchsticks
-fried shallots
-Optional: I added some chopped thai red bird's eye chillies for topping
-nuoc-cham (I use Helen's recipe here: http://danangcuisine.com/recipes/recipe-2-vietnamese-dipping-sauce-cach-pha-nuoc-cham/)

Marinate the beef with garlic for 15 minutes to hours. Cook the beef in a pan, and get all your ingredients ready!

The book says to lay down each ingredients one by one on the rice sheets.  For better presentation and convenience, I suggest tossing together all your ingredients in a bowl!  Then lay about a 6th of the mix at the base of a rice noodle sheet, roll tightly, then cut in the center into two shorter rolls.  Finish your ingredients, pile the half rolls on plates, top with shallots and chillies if using, and dip in nuoc-cham!

Optionally, I would try marinating it with other Vietnamese ingredients, maybe fish sauce, pepper, honey, oyster sauce... But would it still be called Bo Cuon Nem? I'm not a big fan of non-marinated, non-saucy meat, but just garlic makes this recipe simple and fast, and good for steak-loving readers!


Wednesday, 14 May 2014

Lemongrass Beef Plate with Rice Papers (Vietnamese)


I love plates that are full of different items.  I also love lettuce wraps and rice sheet wraps!  This bowl has lemongrass beef, rice vermicelli, herbs, pickles, cucumbers, fried dried tofu, nuts...  Everything you need for a perfect spring roll.  The beef recipe I took from this book.  It was meant to be served in a baguette, but I like my bowl better!  For the ingredients for the bowl, feel free to compose with what you like and have at home... But I wouldn't skip the herbs!

So here's the simplified recipe for Lemongrass Beef Skewers from the book Vietnamese Street Food by Tracey Lister and Andreas Pohl, followed by my own tips to make the perfect bowl!


(makes 10 mini skewers - serves 2-3)

Marinade for 300g nice lean beef, thinly sliced:
-2 shallots, chopped
-3 garlic cloves, chopped
-3 white parts of lemongrass, chopped
-1 long red chilli, seeded and chopped
-1tbsp roasted sesame seeds
-2tsp fish sauce

Grind together, in a mortar and pestle or in a food processor, the shallots, garlic, lemongrass and chilli.  When I use a mortar I always chop everything as small as I can to save time and energy.  When the mixture resembles some kind of rough paste, add slightly grounded sesame or grind in the mortar.  Add fish sauce, mix, and thoroughly massage the beef slices.  Let marinate for an hour to overnight in the fridge.

If using a grill, soak 10 short skewers in cold water for about 30 minutes.  When using a pan, you can skip this step.  Fold the beef slices repeatedly on the sticks to make 10 mini skewers, just enough each for one fresh spring roll.  Grill!


To serve, for EACH plate, I put enough ingredients for 5 rolls (5 lettuce pieces, 10 cucumbers...).  I ate only 3 rolls and kept two for lunch, it's a little big!:

-5 beef skewers
-some Dua Gop carrots and daikon pickles (recipe here: http://sunnysdelights.blogspot.ca/2014/05/banh-mi-with-pork-patties-and-dua-gop.html)
-5 pieces of lettuce
-1 portion rice vermicelli (I had fresh ones!)
-10 half slices of cucumber
-plenty of fresh herbs (just pruned my plants!)
-some chopped almonds or peanuts 
-pieces of dried tofu sheets (cut, deep-fry at at least 350F and drain on paper towels)
-nuoc cham for dipping (I use Helen's recipe, here: http://danangcuisine.com/recipes/recipe-2-vietnamese-dipping-sauce-cach-pha-nuoc-cham/)

Dip a rice sheet in warm water briefly, lay down on a flat plate, put a little of everything and a skewer (without the skewer haha) and roll tightly.  Dip in nuoc-cham, it's sooo good!


Tuesday, 6 May 2014

Bulgogi Spring Rolls (Vietnamese-Korean Fusion)


Since I started cooking Vietnamese, we had fresh spring rolls only once!  In an effort to make it more often (and it's really easy to let everyone wrap their own with what they like - especially my boyfriend who's picky about his veggies), we tried these bulgogi spring rolls from Helen!  They marry delicious korean bulgogi beef (I used Maangchi's recipe!) and kimchi with fresh veggies and herbs like a regular Vietnamese fresh spring roll.  The dipping sauce is a mixture of what every dipping sauce should contain (peanut butter, gochujang, miso, honey...).


So this recipe was inspired by a recipe from Danang Cuisine/Helen's Recipes.  I forgot to add kimchi to mine, but I guess you can put whatever you want.  The sauce is really a must try!  The only real modification I made was to use Maangchi's bulgogi marinade, because it's my go-to bulgogi recipe and I know it's authentic!  

Helen's Bulgogi Spring Rolls Recipe:
http://danangcuisine.com/recipes/bulgogi-spring-rolls-goi-cuon-bo-han-quoc/


For Maangchi's delicious bulgogi marinade, plus instructions and video, go there:

http://www.maangchi.com/recipe/bulgogi


Overall it was really good, fresh, tasty and textural, the dipping sauce I might use for other filling combinations of spring rolls.  You should really try this recipe!

Thursday, 1 May 2014

Thit Bo Nuong (Vietnamese) Vietnamese-Style Grilled Beef


I was really craving the Combo C from that restaurant Chez Lien's menu.  They serve thinly sliced beef top with sesame (which I forgot), on top of rice vermicelli with a salad and a huge deep-fried roll (which I skipped because I had rolls the two days before) and nuoc-cham. I should have cooked it in a pan rather than in a ridged pan so don't do like me.  It was still delicious.  I took the recipe from VietWorldKitchen, who seves it in a different and way more interesting way, recipe here:
http://www.vietworldkitchen.com/blog/2009/06/banh-hoi-with-grilled-beef-recipe.html

I guess there's not much more to say about this plate, but it satisfied my craving!


Tuesday, 22 April 2014

Bo Xao La Lot (Vietnamese)


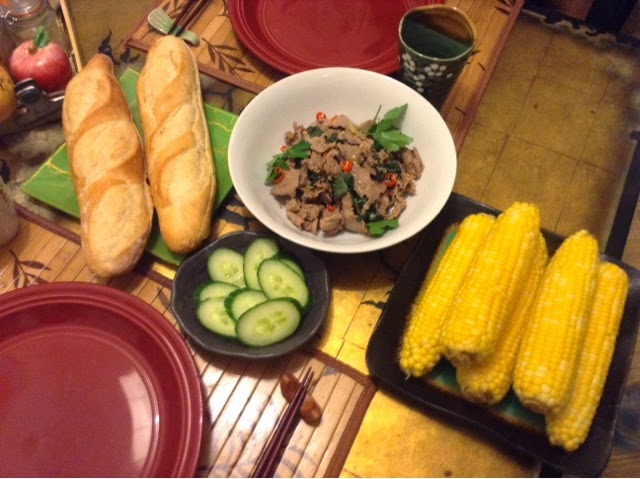
Yesterday for supper we had this really quick (10 minutes) beef dish made with lemongrass and chillies, and some seasonings.  I served it with corn, and even though you could tell it's not the season yet, it still felt amazing to munch on a cob.  Oh how I love you, corn.  

This recipe, as with most of my Vietnamese recipes lately, was taken from this marvellous book by Luke Nguyen called "The Food of Vietnam", that I suggest to anyone who likes Vietnamese food or doesn't know anything about it (like me before my boyfriend got me the book!).

(serves 2 to 4 as a side)

-2tbsp veggie oil
-1 white part lemongrass stem, finely chopped
-2 cloves garlic, finely chopped
-2 red bird's eye chillies finely chopped, plus one finely sliced for presentation.
-300g lean beef finely sliced
-1tbsp fish sauce
-1tbsp soy sauce
-2tsp sugar
-15 betel leaves, roughly cut
-cilantro (or parsley) to decorate

In a really hot wok, add oil and lemongrass and stir a couple seconds.  Then add chillies, garlic and beef and toss for 2-3 minutes.  Add the fish sauce, soy sauce, sugar and betel and toss until beef is cooked.  Plate and decorate with chillies and herbs.


In the book, this beef dish was suggested to be accompanied by rice, but from what I heard Vietnamese will wrap anything in lettuce, rice sheets or baguettes so I opted for half-baguettes since I knew that way my boyfriend wouldn't pick out the betel leaves.  It was a good choice since the beef was really spicy, and even though it was lemongrass and beef, which I never saw in a Banh Mi, it tasted really good and Vietnamese in the baguette.  If you're Vietnamese and you think baguette was a weird choice for this beef, try it, you'll love it!