Thursday 24 April 2014

Thit Kho Tau Bowl (Vietnamese)


My internet friend Gary made this recipe not even a week ago and I had to copy him!  Thit Kho Tau is pork belly and hard-boiled eggs caramelised and slowly simmered with a coconut juice and fish sauce based broth.  The pork is tender but still meaty, the eggs turned salty (in a good way) and the sweet broth is really good over rice.  I used Helen's recipe again, which you can find here:
http://danangcuisine.com/recipes/recipe-42-thit-kho-tau-caramelized-pork-and-eggs/

For the bowl, I used, from bottom to top:
-a mix of jasmine rice, forbidden black rice and thai cargo red rice
-scallion oil
-lettuce, mint, Vietnamese mint, basil and flat parsley, torn appart
-cucumber shoyu-koji pickles (to get the recipes to make shoyu-koji, and the pickles, go to the fermentation category)
-some Thit Kho Tau pork and eggs of course!
-top wit a generous amount of Thit Kho Tau broth

It was a quick meal since I simmered the Thit Kho Tau during the day, so I just had to make rice and microwave the pork and eggs.  I served it with Dua Chua because Helen says it's usually eaten with different pickles.  Recipe here:
http://danangcuisine.com/recipes/recipe-61-dua-chuado-chua-vietnamese-pickled-vegetables/


Wednesday 23 April 2014

Suman sa Lihiya and Suman Malagkit (Filipino)


My boyfriend's mom is filipina and she keeps on (in a nice way) pushing me to cook more Filipino food, because she says that Filipino in Montreal are lazy and they'd rather pay a caterer to get Siao Pao (steamed buns) and Filipino treats than making it.  Yesterday we went to help her at her part time office cleaning job and the whole hour drive she kept on talking to me about this dessert called suman.  I'm guessing suman is how they call all glutinous rice treats, or maybe glutinous rice treats cooked in banana leaves.  She suggested me to make Suman Malagkit, because her brothers and sisters prefer this one so I could sell it to them on special occasions, but herself, she prefers Suman sa Lihiya.


Suman sa Lihiya is made with soaked glutinous rice soaked in water, drained and mixed only with lye water (lihiya), rolled in banana leaves in a special (hassle to make) fashion and tied two by two, then boiled for an hour and a half.  You can top it with brown or palm sugar and coconut (which I was too lazy to defrost). The lye water instantly makes the rice yellowish, and once cooked in banana leaves it turns green. I thought I wouldn't like it because the rice isn't sweetened but with just a little sugar on top it tastes divine!

Recipe I used from Pinoy Cooking:
http://www.pinoycookingrecipes.com/suman-sa-lihiya.html


Suman Malagkit, on the other hand, is dried rice cooked with coconut milk, sugar and salt, until it becomes really sticky (the rice is still hard at this stage).  Then the mixture is placed in banana leaves and steamed 45 minutes.  UPDATE: Steam an hour and a half, 45 minutes is far from enough!

Recipe here:
http://www.pinoycookingrecipes.com/suman-malagkit.html

Sorry for the bad quality of the pictures, I was too tired to make a nice arrangement on the table and there's not much light on my counter under the cupboards.  Maybe I should buy one of those neon to hang under there...  Maybe I'll take nicer pictures when my boyfriend tries it with me.

I also slow-simmered some Thit Kho Tau for supper (will post tomorrow) and I only have two big burners (like most stoves) so all this cooking kept me busy from 10:30am to 3:30pm. Now I'm gonna relax before my mom-in-law comes pick us up to help her again, and she can sample my Suman!  

White Fish Steamed in Banana Leaf with Soya Beans


I feel like I have a hard time finding fish fillets (or fish mongers that offer to fillet your fish for you) other then salmon, trout, or that really soft white fish that I can't remember the name of.  I love mackerel so I have fish bone tweezers and I try my best to fillet fish and try new fish.

I went to this fish restaurant that sells fish.  There's never anyone, they keep most of the lights out, but we've been curious about this place and we've never been before even though it's a block away from our place and we've been living here for 2 years already.

So we entered this place, La Grotta del Mare, and it looked gloomy and it didn't really smell fresh.  I asked the guy for mackerel but he only had shrimps and 3 types of fish (wtf?).  He almost forced me to take this "loup de mer" saying it was really good, then he weighs it, doesn't even ask me if the price is good, and there I am paying for this small fish almost twice the price of a nice sized mackerel...  I put it in the freezer, because I was stuck with it and I rarely cook white fish.

I did some research and found out "loup de mer" is a kind of bass.  I speak really good French and good English, but most recipes I use are in English so I didn't know what a loup the mer was.


Then I got my cooking book from Luke Nguyen and saw this recipe for white fish!  It's fish fillets, spreaded with a soy beans marinade and topped with glass noodles and chillies, wrapped in banana leaves and steamed!  So unexpectedly delicious, like delicious enough to make it again and again, keep in your recipe book.  I wrote that the amount of glass noodles is adjustable because I like a lot of noodles, but if you use as much as me, you won't see the fish (look at my pictures haha).  So here is my version, adjusted and simplified, of "Barramundi Steamed in Banana Leaves with Soya Beans" from the book "The Food of Vietnam" by Luke Nguyen.

(serves 4 - ingredients on the picture for 2)

Marinade for 300g of white fish fillet (the book uses barramundi, I used bass):
-1tbsp sugar
-2tsp fish sauce
-1tsp sea salt
-1tsp ground black pepper
-2tbsp salty soy beans

-20 to 35g glass noodles, soaked for 5 minutes in hot water, then rinsed in cold water and water pressed out 
-4 banana leaf piece, about 8x10
-1 long red chilli, julienned
-1 to 1 1/2tbsp garlic oil (heat some thinly sliced garlic in some oil on medium until the garlic is fried, strain)
-soy sauce to dip the fish

Combine everything for the marinade and spread it on the flesh side (or one of the sides if you removed the skin) of the fillets.  Sandwich them 2 by two with the marinade inside, and leave them to marinate in the fridge for a couple hours.

Start your steamer on high.  (The author says the water must be boiling energetically so the fish cooks faster and stays firm.)

In the middle of each banana leaf, place a piece of fish (I cut my fillets in two and place them next to each other for a square shape) top with marinade, glass noodles, some garlic oil and some chilli strands.  Fold both sides over the center, then flip the other sides under the package.  Repeat 3 more times.  You can tie the squares with kitchen rope or just arrange them on them on the steamer so they don't unfold while cooking.

Steam for 8-10 minutes.  Open the squares with scissors, serve with soy sauce to dip and jasmine rice and a salad or a vegetable side dish.


Tuesday 22 April 2014

Bo Xao La Lot (Vietnamese)


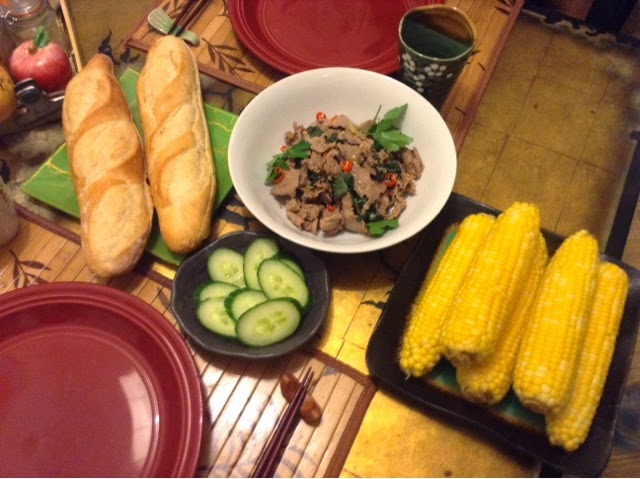
Yesterday for supper we had this really quick (10 minutes) beef dish made with lemongrass and chillies, and some seasonings.  I served it with corn, and even though you could tell it's not the season yet, it still felt amazing to munch on a cob.  Oh how I love you, corn.  

This recipe, as with most of my Vietnamese recipes lately, was taken from this marvellous book by Luke Nguyen called "The Food of Vietnam", that I suggest to anyone who likes Vietnamese food or doesn't know anything about it (like me before my boyfriend got me the book!).

(serves 2 to 4 as a side)

-2tbsp veggie oil
-1 white part lemongrass stem, finely chopped
-2 cloves garlic, finely chopped
-2 red bird's eye chillies finely chopped, plus one finely sliced for presentation.
-300g lean beef finely sliced
-1tbsp fish sauce
-1tbsp soy sauce
-2tsp sugar
-15 betel leaves, roughly cut
-cilantro (or parsley) to decorate

In a really hot wok, add oil and lemongrass and stir a couple seconds.  Then add chillies, garlic and beef and toss for 2-3 minutes.  Add the fish sauce, soy sauce, sugar and betel and toss until beef is cooked.  Plate and decorate with chillies and herbs.


In the book, this beef dish was suggested to be accompanied by rice, but from what I heard Vietnamese will wrap anything in lettuce, rice sheets or baguettes so I opted for half-baguettes since I knew that way my boyfriend wouldn't pick out the betel leaves.  It was a good choice since the beef was really spicy, and even though it was lemongrass and beef, which I never saw in a Banh Mi, it tasted really good and Vietnamese in the baguette.  If you're Vietnamese and you think baguette was a weird choice for this beef, try it, you'll love it!


Com Tam Suon Nuong (Vietnamese)


This weekend was Easter.  I'm not baptized and I don't like chocolate so it's never been the most important day for me.  This year, 4/20 happened the same day as Easter, so we had a friend over, got blazed and I made this Vietnamese plate for brunch, from Danang Cuisine/Helen's Recipes.  Helen says that in Vietnam, people eat this plate at any meal, in between meals or late at night!  With all its different elements, it was the best plate for 4/20's munchies!

This plate is generally composed of a grilled marinated pork chop topped with scallion oil, a special "meatloaf", broken rice, a sunny side-up egg, tomatoes, cucumber, daikon and carrot pickles and a bowl of nuoc-cham.

The yellow squares are in fact a mixture of a small amount of pork, a lot of eggs, seasonings and veggies, AND starch noodles, all steamed together and brushed with yolk during the final cooking minutes.  I was scared it'd be too strange for my tastebuds, but it was interesting and my boyfriend and our guest were impressed and liked it.

If you're interested in this special plate, watch Helen's video here!:
http://danangcuisine.com/recipes/recipe-19-com-tam-suon-nuong-grilled-pork-chop-with-broken-rice/


Saturday 19 April 2014

Ga Xao Sa Ot and Goi Du Du (Vietnamese)


So tonight we had Lemongrass Chilli Chicken and a Green Papaya Salad with rice.  Even though I used Luke Nguyen's recipe for the chicken, I saw Helen's video (from Danang Cuisine) and she says it's one of her favourite ways to eat chicken.  I'd say it's a sweet dish, not just because it has a sweet taste but because the lemongrass and coconut juice gives it a sweet personality!  The papaya salad on the other hand is a little sour, fragrant because of the basil, fresh and crunchy.  I wasn't sure I liked it at first, but now I'm hooked!

First, here is the recipe for "Lemongrass Chilli Chicken" from the book " The Food of a Vietnam" by Luke Nguyen!


(serves 4 - I made only a half recipe on the picture)

Marinade for 500g deboned and skinned chicken:
-3tbsp fish sauce
-1 1/2tbsp sugar
-2 white parts lemongrass, finely chopped, half reserved
-4 garlic cloves, finely chopped, half reserved
-2 long red chillies, finely chopped, half reserved

-3tbsp vegetable oil
-250mL young coconut juice
-1/2 onion, cut into wedges
- coriander or parsley sprigs for presentation

Mix together the fish sauce, sugar, half of the lemongrass, half the garlic and half the chillies in a bowl, then add chicken and marinate 2 hours to overnight.

In a wok, heat oil on medium and cook what's left of lemongrass, chillies and garlic until fragrant (about a minute) then turn to medium-high and toss in chicken until there's no more pink.

Add onion and coconut juice, cover and cook for about 7 minutes, until the sauce is half reduced (keep some juice, it's so good on your rice), then plate and decorate with the herbs.

As suggested, I served it with rice.  I cook 1 cup of rice, I fill one cup with jasmine rice, then remove 2tbsp and replace them with 1tbsp black forbidden rice and 1tbsp cargo thai red cargo rice.

I also served it with this easy green papaya salad that I improvised from watching many videos!


(serves as many as you'll make)

-some shredded green (not ripe) papaya
-some shredded carrots (just to add colour, like a rotisserie coleslaw)
-some thinly sliced basil
-some peanuts
-some garlic chips
-some fried shallots
-red chilli, finely chopped (I used a long red chilli so it's a little less spicy than a bird's eye chilli since my chicken dish was also full of chilli)

The sauce:
-3tbsp fish sauce
-3tbsp rice or white vinegar
-2-3tsp sugar

(To shred the papaya and carrot, Vietnamese either use a special tool I didn't find today or, you can use a sharp nice and kind of hit the papaya vertically along the height, do a lot of cuts, then use a vegetable peeler and it makes long nice strips.  Repeat until you have enough papaya.  That's the technique I used on the picture, except I only had a half papaya so the strips are short :( .)

Mix the sauce so the sugar is dissolved.  Toss the papaya, carrot, basil, peanuts, garlic chips and shallots together with your hands.  Add dressing a little at a time, mix with your hands and test.  When it's to your taste, plate with your hands again (apparently the hands action is really important!) and top with chillies, more shallots and more peanuts.  Voilà!


Friday 18 April 2014

Carbonara Pasta - Mostly Authentic, No Cream (Italian)


Tonight's supper was more like comfort food, and it was the easiest and quickest dish I made in a loooong time. It was also to make my boyfriend happy since I made a salad yesterday!  The recipe comes from Cooking with Dog (the biggest Japanese cooking channel on YouTube) and even though they say their Carbonara has been modified to suit Japanese palate, it's pretty authentic.  I watched a video from an old Italian guy on Jamie Oliver's channel, and between this Italian version and Cooking with Dog's, there's only 4 differences:
-Chef (Cooking with Dog) uses smoked pork belly (slab bacon) instead of cheek (which she probably can't find in japan anyway);
-She adds 1tbsp milk to the raw egg sauce;
-She doesn't cook the egg sauce in the pan which makes it easy not to overcook the egg;
-She tops the dish with spring onions.

Slab bacon was hard to find!  I tried the closest grocery without success, then walked this whole street for 20 minutes because I remembered seeing butchers when passing by on the bus, to realize there was 8 and each and every one of them was Halal.  What's the point of having 8 butchers if they're all halal and I want chunky bacon?  On my way back home, I walked by this grocery and I was lucky, THEY HAD A LOT.  All packed sous vide, a lot of pieces to choose from.  YAAAY!

Since Chef has a video, I won't give you the recipe on my blog and just suggest you to head over here and watch the video:
Chef is soooo cute!


Even though it's not my recipe, I was in a pictures mood!  Here is all the ingredients for 2 (I forgot 2tbsp white wine on the picture). I also used way more bacon, my boyfriend loves me even more now!


And my slab bacon!
We never had real carbonara before.  When you ask for carbonara in Montreal, it's like Alfredo with Canadian bacon...  This version is creamy but feels light.  To make the recipe even better, I made fresh fettuccini (and snapped a picture)!
Have a good night!


Matsukaze-Yaki Miso Chicken (Japanese)


This one chicken side dish tastes so Japanese (it uses Sansho pepper) and it's delicious and very filling.  The traditional version has poppy seeds (like that picture under of another time I cooked it) even though sesame is used in the book because poppy seeds are harder to find in Japan, and I've never seen this dish anywhere on any blog.  I took it from this totally educational gigantissimal book about Japanese cooking I bought when I started cooking daily and strictly Japanese, 3 years ago!  It's similar to a meatloaf but made with ground chicken.  I hope you'll give it a try!  Translated from "Le livre de la vraie cuisine japonaise" by Hiroshi Fukuda, Kôichirô Gotô, Eiji Ishikawa, Wataru Kawahara, Hirohisa Koyama, Yoshihiro Murata, Hiromitsu Nozaki and Masamitsu Takahashi (all skilled celebrity chefs).


(serves 4-6 as a side)

-500g ground chicken
-50 mL saké
-1 egg
-60g miso
-2tbsp sugar
-1tsp Sansho pepper powder OR ginger juice
-mirin
-poppy seeds or raw sesame

Preheat oven to 180C and garnish a 16cmx16cm oven cake tray with parchment paper.  

Mix half of the chicken with the saké and cook in a pan until almost all liquid is gone.  Crumble the chicken with your fingers, until there's no more big clumps. To this mixture add the leftover raw chicken, egg, miso, sugar and Sansho pepper or ginger juice and mix well by hand.

Spread the mixture in the cake tray and flatten it.  Wipe the edges of the pan clean.

Bake for 15-20 minutes, remove from oven, splash the surface with mirin and top with seeds.  Return to the oven and cook for 15-18 minutes.  The book says that when it's ready, the center of the chickenloaf should have the same consistency as the sides when you press them.  

Remove from the oven, let cool down a little, then unmold and cut in rectangles.

If you're wondering, the reason why you need to cook half the chicken first is if you skip this step, the meat will shrink too much as it cooks and the final result won't have a nice shape.


Thursday 17 April 2014

Chargrilled Salmon Salad (Vietnamese)


Tonight's supper is a salad of fresh herbs, pickles and marinated rare salmon with fried shallots and garlic chips and topped with peanuts and nuoc-cham. I served it with rice and kropek (shrimp crackers).  I thought it was amazing, but unfortunately my boyfriend doesn't like herbs or most veggies, so he ate only the fish, nuts and fried shallots and garlic and it made me feel horrible to throw out everything, but that's the price to pay when I want a salad, and that salad was worth it, so without more talking, here is "Chargrilled Salmon Salad" simplified and slightly modified, from the book "The Food of Vietnam" by Luke Nguyen.


(serves 2 people)

Marinade for 200g salmon fillet, skin removed:
-1 garlic clove, chopped
-2tsp sugar
-1 1/2tbsp fish sauce
-1 red bird's eye chilli, chopped

-150 g pickled vegetables (I didn't use the recipe from the book, I used a mix of cucumber sticks and mostly Dua Gia pickles - not the ones on the picture, I changed my mind later - recipe here: http://danangcuisine.com/recipes/dua-gia-vietnamese-pickled-bean-sprouts-recipe/)
-1 handful watercress, roughly cut
-a couple perilla leaves, mint, parsley...  roughly sliced
-1tsp fried garlic chips (recipe follows)
-3tbsp nuoc-cham (I use this recipe: http://danangcuisine.com/recipes/recipe-2-vietnamese-dipping-sauce-cach-pha-nuoc-cham/)
-1tbsp roasted peanuts
-some fried shallots
-one bird's eye chili, thinly sliced


First, mix everything for the marinate until the sugar has dissolve.  Coat the fish and marinate in the fridge for 20 minutes to a couple hours.


Meanwhile, let's make the garlic chips.  Slice some garlic as thinly as you can (you only need a tsp for the recipe, but if you want to fry more, it keeps well).  Heat some oil to medium high, enough to contain the garlic, then fry the garlic until slightly golden and remove fast and let dry on a paper towel.  When the oil is drained, they'll become crisp.  If you don't have store-bought fried shallots like me, you can use this recipe to fry shallots too!

When you're ready to eat, grill your salmon (I used an oiled ridged pan) and char the salmon only 2-3 minutes on each side, keeping the center rare.  Remove from grill or pan and let cool down and rest 5 minutes.

Flake the salmon in a bowl with the watercress, herbs, pickles, garlic chips and nuoc-cham, mix everything together and top with peanuts, fried shallots and chillies!

And there you have it, a fancy-ass restaurant style salad!


Lo Mai Gai (Chinese) Sticky Rice and Chicken Steamed in Lotus Leaves


This rice is so good, it has that dry but slightly oily texture of fried rice, but it's steamed!  It's full of marinated chicken, dried shrimps, mushrooms and sausage...  But it has a lot of step.  When I got this book "Gingembre et Citronnelle" ("Ginger and Lemongrass") by Leemei Tan, that one recipe always called me and I would find myself back at that page.  So when I found these HUGE lotus leaves in Chinatown, I knew I had to give it a try!  I hope I looked cool on the bus and metro with my gigantic leaves!  

So here is "Feuilles de lotus garnies au poulet et riz gluant" with all its steps from the book "Gingembre et Citronnelle" by Leemei Tan, translated and simplified as much as I could.


(for 4 people)

Marinade for 600g deboned chicken legs, skin removed and cubed
-1tbsp sugar
-2tbsp light (coloured) soy sauce
-2tbsp dark soy sauce
-1tbsp oyster sauce
-1tbsp sesame oil
-the juice of 2cm peeled and grated ginger, pulp discarded
-1tbsp Shaoxing wine
-1tsp cornstarch

Rice seasoning:
-1/4tsp sea salt
-1tbsp sugar
-1tbsp light soy sauce
-2tbsp dark soy sauce
-1tbsp oyster sauce
-2tbsp sesame oil
-a pinch of black pepper

-500g jasmine rice, soaked for 30 minutes
-30g dried shrimps, soaked in warm water for 20 minutes, drained well
-1tbsp vegetable oil
-120g Chinese sausage or chorizo, cubed
-30g dried mushrooms dried chinese or shiitake mushrooms, soaked in warm water for an hour, water pressed out and chopped roughly
-4 dried lotus leaves
-freshly ground black pepper

Mix everything for the marinade in a bowl, add chicken and let it rest in the fridge for at least 2 hours.

Mix all ingredients for the rice seasoning in a big bowl and add the drained rice, mix well.

In a steamer, spread some parchment paper and the rice over it.  Drizzle 1tsp water over it and cook 30 minutes.  After 30 minutes, add another 1 or 2tsp water over the rice and cook for an extra 15 minutes.  Remove from steamer and let it cool.

Meanwhile heat oil on medium-high in a pan and cook sausage for a minute.  Add shrimps and mushrooms and cook 2 minutes.  Add chicken and cook 5 minutes.  Add 3tsp water and cook another couple minutes until the chicken starts to golden, then remove everything from the pan and reserve.

Boil water in a big pan or wok and dip the lotus leaves until soft.  Cool them under cold water and dry them with paper towels.  Cut off hard pieces then cut each leaf in four.  The author says you can use parchment paper instead of lotus leaves, I say if you can find the leaves it's worth it!  The aroma is awesome!

Pile 2 leaves together, and add about two big tbsp of rice and spread a little.  Top with 3tbsp of meat mixture, spread, and top again with 1tbsp rice.  Fold the leaf to make a closed rectangle and tie with kitchen rope.  

Steam the pouches for 20-25 minutes.  From my experience, the pouches keep good before this step a day or two in the fridge, so you can make more and steam them for a quick lunch or dinner!

Butter Chicken or Makhani Gravy for Butter Everything! And Tandoori/Tikka Chicken Marinade (Indian)

This recipe is the one I've been using for more than a year to make Murgh Makhani, known as Butter Chicken.  This recipe is for the tomato gravy sauce, and for real restaurant butter chicken you have to have to have to use cooked tandoori chicken (so I'll provide a marinade recipe in this post too!)!  I took this recipe from the very talented and funny celebrity chef Harpal Singh Sokhi.  This is a recipe from one of his videos, but written down by me for your commodity in the kitchen (and mine!).  You can see the video here:
So here's the written version of Murgh Makhani by Harpal Singh Sokhi:


(for 3-4 people)

-500g tomatoes, diced in big cubes
-1 tbsp oil
-1 tbsp butter
-3-4 green cardamom pods
-a couple blades of mace
-1/2tbsp garlic, chopped
-1/2tbsp ginger, finely julienned
-1-2 green indian chilies, cut in 2 lenghtwise and deseeded, julienned
-1tbsp butter again
-1/2tbsp red chili powder (or less if you can't stand spicy, this is authentic indian food!)
-salt to taste
-half a cup 30% cream
-a pinch or 2 of green cardamom powder
-1/2tbsp honey
-1/4tsp (I use 1/2tsp to a tsp) kasoori methi leaves
-tandoori chicken (see marinade at the end of this recipe) or paneer and/or vegetables... for 4 people

In a warm pan, add 1 tbsp butter and the oil.  Once it's hot, add cardamom pods and mace and stir a little.  Then add garlic and cook 2-3 minutes.  Add tomatoes and simmer 10 to 15 minutes until cooked and soft.  Allow to cool down a little then grind in the blender into a fine paste.

Add the remaining 1 tbsp butter to the empty pan and melt, then add ginger and chilies.  Strain the tomato mixture over the pan and simmer for another 10 minutes stirring once in a while, until the acidity and rawness of the tomatoes fades totally.  Add chili powder and salt to taste, then add your main ingredient (chicken, paneer, vegetables...) and cook 5 more minutes.  Stir in cream, cardamom powder, honey and crumbled kasoori methi.  Simmer a minute or two and it's done! 


Tandoori Chicken Marinade, from "Ginger and Lemongrass" book by Leemei Tan:
-5tbsp Greek yogurt
-4 garlic cloves, peeled and crushed
-2tsp red chili powder
-1tsp paprika
-2tsp cumin powder
-2tsp turmeric powder
-1tbsp coriander powder
-1/2tsp ground black pepper
-1/4tsp saffron powder
-1/2tsp sea salt
-the juice of half a lime
-1tbsp vegetable oil
-30g butter, soft

Mix everything and marinate 6 whole chicken legs (with 4 deep slashes on top) or 3-4 deboned breasts in cubes overnight, then bake in the oven (skewering the breast cubes is convenient).

Hope you enjoy this really addictive, delicious authentic butter chicken!


Shio-Koji and Shoyu-Koji, healthy fermented condiments (Japanese)

Koji is a rice coated in a special mold and used to ferment saké, soy sauce, miso, mirin...  And you can also use it to make easy fermented condiments at home and a drink called Amazaké, which is a little more complex to make so it'll have it's own post soon.  Koji rice can be found at the Japanese grocer.

Shio-Koji is fermented koji rice with sea salt and water, and Shoyu-Koji is koji rice fermented with shoyu (Japanese soy sauce).  They're really good for you, have a really intense umami taste and replace salt well!  The recipes to make them are so simple that I just know them by heart!  But they require to be mixed everyday until ready, and even though shio-koji will take about 10 days, shoyu-koji can be left to ferment from 1 to 5 months.  Remember, you'll have to mix everyday for 5 months!


SHIO-KOJI
-any amount of koji, I used 500g
-30% of the koji worth of FINE SEA salt, so 150g
-enough water to barely cover the rice, plus more the second day

In a container with airtight lid, mix well the koji rice and salt.  Add enough water for the rice to be submerged when everything is nicely mixed.  The second day the rice will have soaked the water so mix and add enough water again so the rice is just submerged.  Then, just mix once a day, for 7-10 days depending on the temperature in your kitchen.  After that you can stop mixing and store in the fridge for a couple months.


SHOYU-KOJI
-any amount of koji, let's use 500g again
-double the amount koji rice worth of shoyu, check for naturally brewed on the label and a short list of ingredients

Mix koji rice with shoyu in a container (I had to use 2 - more shoyu-koji for me!).  The second day, you'll notice the rice soaked some of the liquid.  Mix once daily.  You can use after a month, but keep at room temperature and continue stirring daily for a couple months to improve taste.  After a couple months you can stop stirring and keep in the fridge for a couple more months.

And now, what to do with the condiments?  Shio-Koji can be used raw, in stir -fried and marinades.  Shoyu-Koji is not recommended for marinades, except that, use in place of soy sauce in stir-fries, soups, dipping sauces...  But remember, both Shio-Koji and Shoyu-Koji burn fast.  If I remember well, 1 tsp salt = 2 tsp shio-koji = 4 tsp soy sauce or shoyu-koji.  Replace salt everywhere you can!


like to make pickles with one of the other condiments (or ama-koji if you have it) and just cut some veggies (cucumbers, carrots, peppers...), put them in a small ziplock and add a spoon or two of shio-koji or shoyu-koji.  Leave it in the fridge all day and it should be ready for supper!  So good and simple.

Here are some websites with recipes using shio-koji or shoyu-koji.  I'll post about ama-koji (sweet fermented rice porridge) soon!:

Cooking with Koji:
http://cookingwithkoji.wordpress.com

Nami Chen from JustOneCookBook created a couple shio-koji recipes for her sponsor here:
http://www.hikarimiso.com/recipes/shiokoji/

Kojiya:
http://www.kojiya.jp/recipes/index.html

Koji recipes at Cookpad, the biggest Japanese recipe website:
https://en.cookpad.com/search/Koji

Bun Thit Nuong (Vietnamese)

Yesterday for supper I made some Bun Thit Nuong for the second time, but with a different recipe, taken from The Food of Vietnam by Luke Nguyen.  It was delicious!  The original recipe calls for pork neck, but since I couldn't find pork neck anywhere, I bought pork shoulder, which I've never cooked with before.  As I sliced a half-frozen piece, each slice would break because of all the fat.  I marinated the meat overnight, and when I was ready to skewer, I started doubting that I'd enjoy the meat just because of all that thick fat.  But once "grilled" (I only have a ridged pan - I still love that pan, a gift from my aunt Myriam), the fat was totally gone!  Only one bite I had some unchewable piece, but the rest was only meaty!  I guess next time I won't be as scared of trying new cuts of meat. 

About this recipe, it uses the most Vietnamese ingredients: fish sauce, pork, rice vermicelli, herbs, nuoc-cham, fried shallots.  It's so tasteful, one of my favourites!

So here is the Bun Thit Nuong recipe, adapted from "Chargrilled Pork Neck with Vermicelli Noodles", from the book "The Food of Vietnam" by Luke Nguyen.


(Serves 2 hungry people)

Marinade for 500g of thinly sliced pork neck, shoulder or fillet:
-2tbsp sugar
-4tbsp fish sauce
-1tbsp honey (I used barley malt syrup for colour and caramel taste)
-6 green onions, white parts puréed in a mortar, green parts finely sliced and reserved for the scallion oil
-2 garlic cloves, chopped
-2 tbsp vegetable oil
-6 bamboo skewers or more, soaked in cold water for 30 minutes if you use a grill (I used a griddle pan so it wasn't necessary)

Scallion oil:
-reserved sliced green parts of green onions
-1 cup vegetable or canola oil (avoid coconut oil since it hardens in the fridge)
-a pinch of salt and/or sugar (optional)

-2 portions rice vermicelli, cooked
-1-2 handfuls herbs (different mints and basils, perilla, cilantro if you like but I don't so I always replace it with flat parsley...)
-about 10 cm cucumber, sliced 
-1-2 handfuls bean sprouts
-nuoc-cham (dipping fish sauce - I use this recipe: http://danangcuisine.com/recipes/recipe-2-vietnamese-dipping-sauce-cach-pha-nuoc-cham/
-fried shallots for garnish
-roasted peanuts for garnish

Combine all marinade ingredients (except the skewers haha) together and marinate the meat for a couple hours to overnight.

For the scallion oil, put oil and scallions, plus salt and sugar if using in a small pot on low, and remove when it starts boiling a little, cool down and keep in the fridge for days.

Skewer the meat by folding on the sticks, then leave at room temperature for 30 minutes (when I don't, the meat in the center doesn't cook properly by the time the outside is charred).  Grill until nicely charred on all side.  You can cook the vermicelli at the same time.

To assemble, start with the vermicelli, then disperse the herbs, cucumber and bean sprouts.  Add skewers on the side and garnish them with some scallion oil.  Garnish the plate with fried shallots and peanuts.  Top everything with nuoc-cham.  You can eat as a bowl or serve with lettuce leaves or rice sheets, putting a little of everything in the leaf or sheet.  

Last time I made Bun Thit Nuong with this different recipe and it looked like this, it was delicious too and it has a video!:


Homemade Egg Noodles/Pastas (Basics)


Pastas are really easy to make, and made with eggs, they go well in many Asian dishes (I even cut them thin for Ramen or Yakisoba!).  They freeze well too, and even though having a pasta machine makes it easier, it's easily doable by hands!  

For each one person portion:
-125 g flour (use bread/gluten flour for chewy noodles, but all-purpose will do), plus more for dusting
-one large or extra large egg
-a little water if needed

Mix the flour and egg(s) with a fork.  Add water little by little if needed (I always need a little).  Knead dough until smooth on a floured space (alternatively, use a pasta machine to flatten the dough, fold, do it over again a couple times, until the dough looks pretty, or if you don't have a pasta machine and can't force with your hands or arms, put the dough in a big ziplock bag, cover it with a towel and walk on it until flat.  Open the bag, fold twice then rewrap and walk again.  Repeat until the dough is smooth, about 4-5 times.).  If not using a pasta machine, flatted the dough with a rolling pin to about an 1/8" thick, or to your taste but too thick won't cook through. 

Adding flour on the surface of the dough each time you fold, fold your dough in 3 like a letter.  Use a good knife and cut dough into noodles of the desired wideness.  Even though I use a pasta machine to flatten the dough, I like cutting it by hand!  Use flour to keep the unfolded noodles from sticking to each other. Keep in the fridge until needed for a week or freeze (unthaw before boiling).  When you cook, try to shake off as much flour as you can before putting in water or use a big pot of water or the water will thicken and the noodles won't cook through.

I used the wide noodles on the picture to make these delicious healthy Hoto Noodles from Cooking with Dog, watch the video here:

Yaki-Onigiri in Lightly Seasoned Dashi (Japanesese)

I like bold flavours generally, but when I'm a bit under the weather or my stomach feels weird, I love this rice soup!  This one is my creation and is easy, but not to steal ideas without crediting, I took the idea of the onigiri in the soup from RunnyRunny999, a really funny (sensitive) guy on YouTube I've been following for years!  So here is how I did it!
(for 2 people)

For the broth:
-4-5cups water
-a handful of katsuobushi (shaved dried bonito)
-1 piece of kombu
-some mirin and soy sauce
-sesame oil (optional)

-1 cup cooked Japanese rice (here I mixed half Japanese rice, half barley, and a couple sunflower seeds, but you do need a good ratio of white Japanese rice if you want it to hold it's shape)
-thin julienned carrots, cabbage, thinly sliced leeks...  really, any veggie of your choice
-1-2tbsp julienned ginger
-some chopped spring onions for garnish
-sesame for garnish
-cooked meat of your choice, I used leftover JangJoRim (recipe at the end) and used the egg as a topping and the liquid for seasoning, but any cooked meat and a hard boiled egg will do

First, make the dashi (broth) by putting the water in a pot with the katsuobushi and kombu, covering and leaving it to rest for 2-4 hours.  Then, slowly bring to a boil BUT remove before it boils (when you see bubbles stuck around the inside of the pot, but they're not moving).  Filter and you got a delicious dashi, base to everything Japanese!

Cook rice and let cool down enough to handle.  Prepare a small bowl with warm water and a little bit of salt to wet your hands so the rice doesn't stick, then form 2 or 3 the onigiri with all the rice.  Lightly wet your hands and press the rice not too much but still firmly (or it won't hold while grilling) into a flat triangle, or even easier, a flat disk.  Heat a griddle pan or pan on medium-high heat, lightly grease then grill the onigiri on both sides until charred or nicely browned.  When you're not using the yaki-onigiri in a soup, you can also cook a little both sides again with a little brush of soy sauce!

For the soup, in a wok, add a little oil and stif-fry ginger until fragrant.  Then add the julienned veggies until wilted.  Then add dashi and bring to a boil.  When the veggies are cooked to your taste, season with mirin and soy sauce (JangJoRim liquid in my case) to taste, mirin being a little sweet and soy sauce salty.  Simmer for a minute to burn the alcohol from the mirin.  Lastly, turn off the heat, and If you use sesame oil, add just a little (1/4tsp to 1/2tsp not to overpower the light dashi aromas).

To serve, put one onigiri in a wide bowl, add shredded cooked meat, then pour the soup.  Top with sesame, green onions, thinly sliced mushrooms, Nanami Togarashi...


Here's what JangJoRim looks like, in the green square plate at the bottom, it's beef in soy sauce with hard-boiled eggs, I use an hybrid of these two recipe by Maangchi and Aeri:
Maangchi->  http://www.maangchi.com/recipe/jangjorim
Aeri Lee->     http://aeriskitchen.com/2008/10/korean-beef-side-dish-jangjorim/

Bun Cha (Vietnamese)

Another Vietnamese recipe from Helen: Bun Cha.  Chargrilled marinated pork belly and patties, served with rice vermicelli, lettuce, herbs and deconstructed nuoc-cham with delicious pickles, and all is in the same recipe!  To eat, prepare you nuoc-cham bowl by adding some meat to it, some pickles and some garlic and chilies.  Take a little lettuce, herbs and vermicelli, drop in the nuoc-cham bowl and pick back up with some meat and pickles!  Crazy good!

Here's the bun Cha recipe!
http://danangcuisine.com/recipes/recipe-43-bun-cha/

Deep-Fried Vietnamese Dumplings (Vietnamese)

Here is a recipe I took from Danang Cuisine (or Helen's Recipe on YouTube).  Helen is really good at Vietnamese cooking, I suggest her website and channel!  These crispy dumplings are filled with pork veggies and glass noodles, and a piece of egg!  Helen recommends eating them wrapped in a lettuce leaf with some herbs and dip it in nuoc-cham.  The crisp of the lettuce and the crunch of the fried dumplings go well together.
When I made the dumplings, maybe my wrappers were smaller or something but it made 70 dumplings.  Also I used chicken eggs instead of really expensive quail eggs.  And yeah, 70...  I froze some for convenience.  So far, I only used them a second time and made this delicious bowl of vermicelli, herbs and lettuce, cucumbers, topped with the dumplings, marinated grilled pork belly and some nuoc-cham.  It was great and fast. So start your dumplings!
Here is Helen's recipe for fried dumplings:
http://danangcuisine.com/recipes/recipe-vietnamese-crispy-dumplings-banh-goi-banh-xep-banh-quai-vac/

Her recipe for nuoc-cham that I always use:
http://danangcuisine.com/recipes/recipe-2-vietnamese-dipping-sauce-cach-pha-nuoc-cham/

And for the bowl, I took the marinade for the pork from this delicious Bun Cha recipe:
http://danangcuisine.com/recipes/recipe-43-bun-cha/